Data extraction is the very first step of an ETL process. We need to load data from external data stores like RDMBS or logging file system, and then we can do cleaning, transformation and summary. In modern website stack, MySQL is the most widely used database, and it’s common to extract data from different instances and load into a central MySQL database, or directly into Hive. There’re several query-based techniques that we can use to do the extraction, including the popular open source software Sqoop, but they are not meant for real-time data ingestion. Binlog, on the other hand, is a real-time data stream that is used to do replication between master and slave instances. With the help of Alibaba’s open sourced Canal project, we can easily utilize the binlog facility to do data extraction from MySQL database to various destinations.
Canal Components
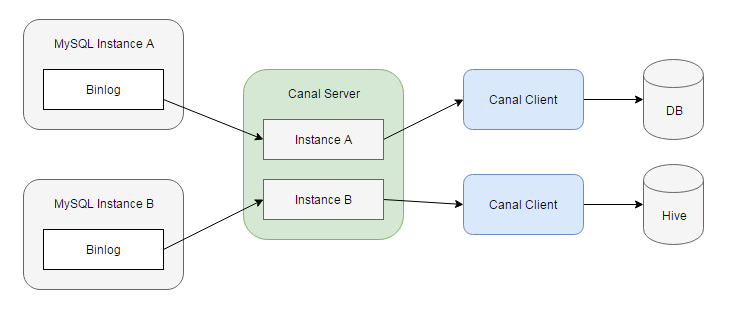
In brief, Canal simulates itself to be a MySQL slave and dump binlog from master, parse it, and send to downstream sinks. Canal consists of two major components, namely Canal server and Canal client. A Canal server can connect to multiple MySQL instances, and maintains an event queue for each instance. Canal clients can then subscribe to theses queues and receive data changes. The following is a quick start guide to get Canal going.
Configure MySQL Master
MySQL binlog is not enabled by default. Locate your my.cnf file and make these changes:
1 | server-id = 1 |
Note that binlog_format must be ROW, becuase in STATEMENT or MIXED mode, only SQL statements will be logged and transferred (to save log size), but what we need is full data of the changed rows.
Slave connects to master via an dedicated account, which must have the global REPLICATION priviledges. We can use the GRANT statement to create the account:
1 | GRANT SELECT, REPLICATION SLAVE, REPLICATION CLIENT |
Startup Canal Server
Download Canal server from its GitHub Releases page (link). The config files reside in conf directory. A typical layout is:
1 | canal.deployer/conf/canal.properties |
In conf/canal.properties there’s the main configuration. canal.port for example defines which port Canal server is listening. instanceA/instance.properties defines the MySQL instance that Canal server will draw binlog from. Important settings are:
1 | # slaveId cannot collide with the server-id in my.cnf |
Start the server by sh bin/startup.sh, and you’ll see the following output in logs/example/example.log:
1 | Loading properties file from class path resource [canal.properties] |
Write Canal Client
To consume update events from Canal server, we can create a Canal client in our application, specify the instance and tables we’re interested in, and start polling.
First, add com.alibaba.otter:canal.client dependency to your pom.xml, and construct a Canal client:
1 | CanalConnector connector = CanalConnectors.newSingleConnector( |
The code is quite similar to consuming from a message queue. The update events are sent in batches, and you can acknowledge every batch after being properly processed.
1 | // printEntries |
Every Entry in a message represents a set of row changes with the same event type, e.g. INSERT, UPDATE, or DELETE. For each row, we can get the column data like this:
1 | // printColumns |
Full example can be found on GitHub (link).
Load into Data Warehouse
RDBMS with Batch Insert
For DB based data warehouse, we can directly use the REPLACE statement and let the database deduplicates rows by primary key. One concern is the instertion performance, so it’s often necessary to cache the data for a while and do a batch insertion, like:
1 | REPLACE INTO `user` (`id`, `name`, `age`, `updated`) VALUES |
Another approach is to write the extracted data into a delimited text file, then execute a LOAD DATA statement. These files can also be used to import data into Hive. But for both approaches, make sure you escape the string columns properly, so as to avoid insertion errors.
Hive-based Warehouse
Hive tables are stored on HDFS, which is an append-only file system, so it takes efforts to update data in a previously loaded table. One can use a JOIN-based approach, Hive transaction, or switch to HBase.
Data can be categorized into base and delta. For example, yesterday’s user table is the base, while today’s updated rows are the delta. Using a FULL OUTER JOIN we can generate the latest snapshot:
1 | SELECT |
Hive 0.13 introduces transaction and ACID table, 0.14 brings us the INSERT, UPDATE and DELETE statements, and Hive 2.0.0 provides a new Streaming Mutation API that can be used to submit insert/update/delete transactions to Hive tables programmatically. Currently, ACID tables must use ORC file format, and be bucketed by primiary key. Hive will store the mutative operations in delta files. When reading from this table, OrcInputFormat will figure out which record is the latest. The official sample code can be found in the test suite (link).
And the final approach is to use HBase, which is a key-value store built on HDFS, making it perfect for data updates. Its table can also be used by MapReduce jobs, or you can create an external Hive table that points directly to HBase. More information can be found on the official website.
Initialize Target Table
Data extraction is usually on-demand, so there may be already historical data in the source table. One obvious approach is dumping the full table manually and load into destination. Or we can reuse the Canal facility, notify the client to query data from source and do the updates.
First, we create a helper table in the source database:
1 | CREATE TABLE `retl_buffer` ( |
To reload all records in user table:
1 | INSERT INTO `retl_buffer` (`table_name`, `pk_value`) |
When Canal client receives the RowChange of retl_buffer table, it can extract the table name and primary key value from the record, query the source database, and write to the destination.
1 | if ("retl_buffer".equals(entry.getHeader().getTableName())) { |
This approach is included in another Alibaba’s project Otter.
Canal High Availability
- Canal instances can be supplied with a standby MySQL source, typically in a Master-Master HA scenario. Make sure you turn on the
log_slave_updatesoption in both MySQL instances. Canal uses a dedicated heartbeat check, i.e. update a row periodically to check if current source is alive. - Canal server itself also supports HA. You’ll need a Zookeeper quorum to enable this feature. Clients will get the current server location from Zookeeper, and the server will record the last binlog offset that has been consumed.
For more information, please checkout the AdminGuide.
References
- https://github.com/alibaba/canal/wiki (in Chinese)
- https://github.com/alibaba/otter/wiki (in Chinese)
- https://www.phdata.io/4-strategies-for-updating-hive-tables/
- https://hortonworks.com/blog/four-step-strategy-incremental-updates-hive/
- https://cwiki.apache.org/confluence/display/Hive/Hive+Transactions