Composition API is one of the major features of Vue 3, and it greatly changes how we organize code. Vue 3 also introduces Pinia as the recommended state management library, superceding Vuex that now enters maintenance mode. It would be nice if we can use these cool features in Vue 2 project, since migration of legacy project could be difficult and costly. Fortunately, the community has tried hard to bring Vue 3 features back to Vue 2, like @vue/composition-api, unplugin-vue2-script-setup and vue-demi. Recently, Vue 2.7 is released and backports features like Composition API, <script setup>, defineComponent, etc. This article will show you how to change your code from Options API to Composition API, from Vuex to Pinia.
Why Composition API
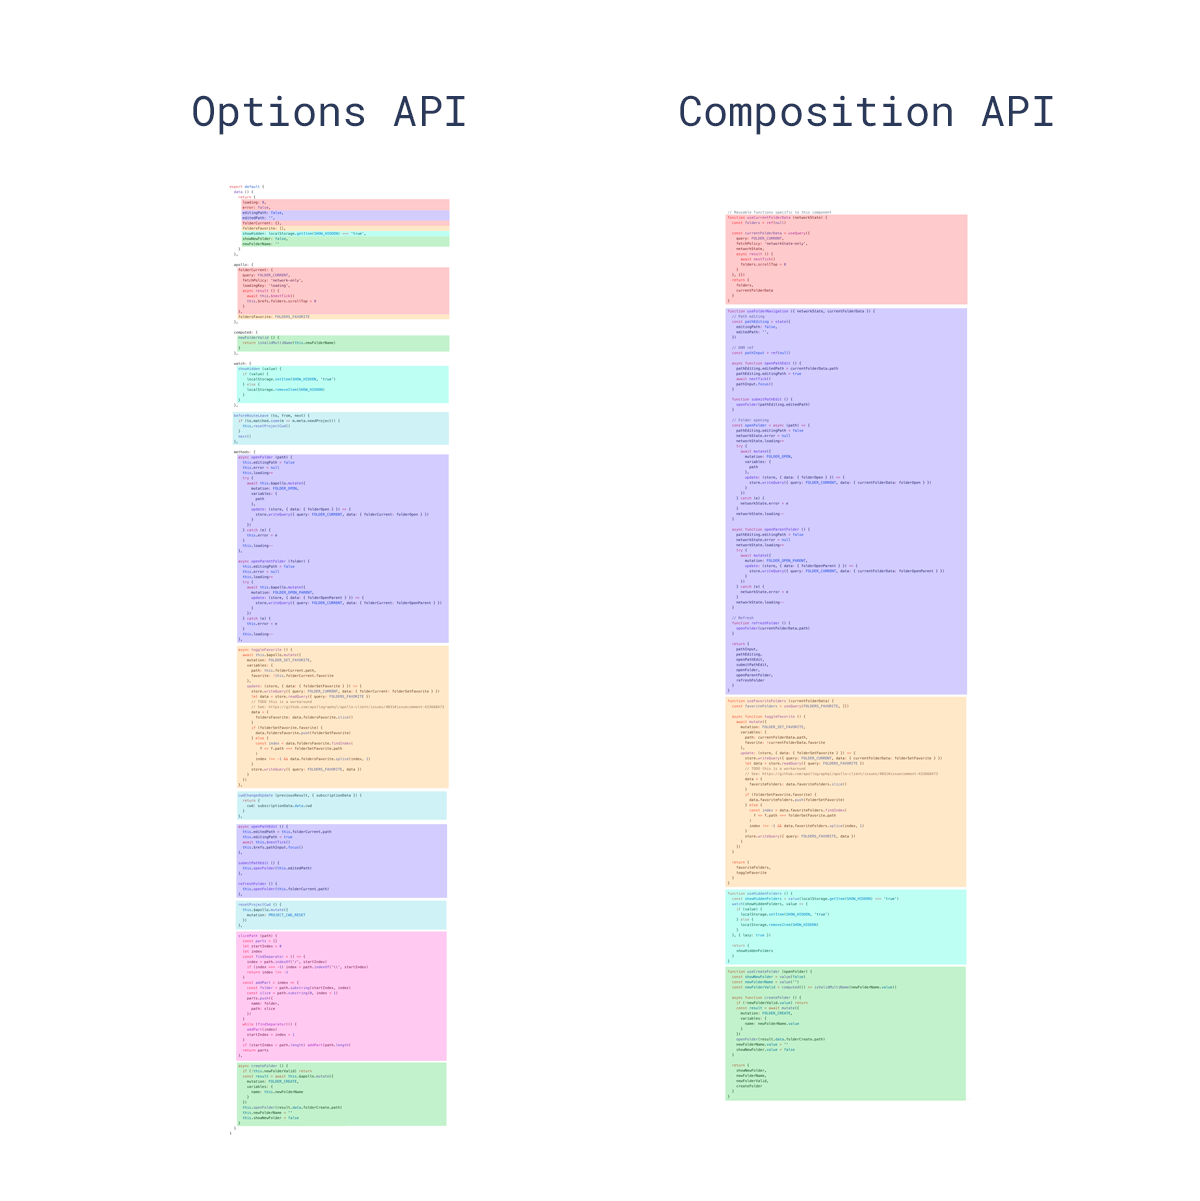
The main advantage of Composition API is that you can organize your code in a more flexible way. Previously with Options API, we can only group codes by data, methods, and hooks, while with Composition API, codes constituting one feature can be put together. There is a nice figure in the official document Composition API FAQ that illustrates how code blocks look differently after applying Composition API.
Another important advantage is better type inference. With Vue 2, TypeScript has a difficulty in inferring types from Options API, so we have to use Vue.extend or class-based components. Though Vue 2.7 backports defineComponent that improves this situation, Composition API still provides a more natural and concise way to define types, for it only consists of plain variables and functions. So in this article, I will use TypeScript as the demo language. If your legacy project hasn’t adopted TypeScript yet, you can check out my previous post Add TypeScript Support to Vue 2 Project.
For maintainers of larger projects, Composition API also brings better code reuse through custom composable functions, as well as smaller JS bundle and better performance. And last but not least, you can always use both APIs in one project. The Vue team has no plan to remove Options API.
From Options API to Composition API
The transformation is not difficult, so long as you see the connection between these two APIs. Let’s start with a simple component:
1 | <template> |
There is a state, a lifecycle hook, and one method. The Composition API version is:
1 | <template><!-- Not changed --></template> |
State becomes a ref; the mounted lifecycle hook becomes an onMounted function call; increment becomes a plain function. All logics go into the setup function of the component definition, and the returned variables can be used in template (count, increment). You may wonder if you can mix the Composition API with Options API in the same component. The answer is yes, but it is not a good practice, so do it judiciously.
To further simplify the definition, use the syntax sugar <script setup>, also available in Vue 2.7:
1 | <script setup lang="ts"> |
More on states
ref is used to define a single state variable, and we have to use .value to get and set its value. You can pass an object or array to ref, but it is not convenient to change only one member of the state, like changing a field value in a form. So reactive would be a better choice here.
1 | <template> |
reactive looks much more like the data section in Options API. The difference is you can define multiple ref and reactives in one component, place them nearer to where they are used. There are other topics on component state, like computed and watch, please take a look at the official document Reactivity API: Core.
Define component’s props and emits
Let’s wrap login form into a component, to see how props and emits are defined:
1 | <template><!-- Not changed --></template> |
This component takes props as the initial values of form fields, and when the form is submitted, it emits the login event to parent component:
1 | <template> |
We can see props and emits are both strongly typed, so TS will highlight any violation of the component interface.
Template refs are also supported in Composition API with TS. I wrote a post about wrapping Bootstrap 5 modal into a Vue component, with template ref and v-model. Please check out Use Bootstrap V5 in Vue 3 Project.
From Vuex to Pinia
State management library is often used when you want to share states between different components. Rather than lifting the state up, we use a dedicated global state store that results in cleaner code and good separation of concerns. A store is also used to interact with backend APIs, and it gives better integration with DevTools. In fact, using a state store has become a standard approach in frontend development.
In Vue 2, the default state management library is Vuex, and that is changing in Vue 3, because you can either use Reactivity API (ref, reactive, etc.) or Pinia to replace it with. I am not covering every aspect of Vuex or Pinia, just showing you how to convert a daily used Vuex store into new forms. Like this simple user store in Vuex 3.x:
1 | import * as service from '@/services/user' |
The login method sends username and password to remote API and if login successfully, save the username to its state. Then the state can be shared among components like nav bar, a dropdown of user list, etc. The Pinia version removes the mutation part, thus making the store a little bit simpler:
1 | import { defineStore } from 'pinia' |
Removing mutation may be the biggest improvement. Pinia also has better type inference out of the box, while in Vuex we need to define complex wrappers around store. Both integrates well with Composition API, because Vuex 4.x is built for Vue 3.x. Detailed comparison can be found on Pinia’s official document. To use the store:
1 | <template> |