Dependency Injection in Flink

TL;DR

Compose dependency graph with Guice:

1
2
3
4
5
6
7
8
9
10
11
public class DatabaseModule extends AbstractModule {
@Provides @Singleton
public DataSource provideDataSource() {
return new HikariDataSource();
}

@Provides @Singleton
public UserRepository provideUserRepository(DataSource dataSource) {
return new UserRepositoryImpl(dataSource);
}
}

Create singleton injector:

1
2
3
4
5
6
7
8
9
10
11
public class AppInjector {
private static class Holder {
static final Injector INJECTOR = Guice.createInjector(new DatabaseModule());
}

private AppInjector() {}

public static void injectMembers(Object instance) {
Holder.INJECTOR.injectMembers(instance);
}
}

Use in Flink function:

1
2
3
4
5
6
7
8
9
10
11
12
13
14
15
public class UserMapper extends RichMapFunction<Long, User> {
@Inject
transient UserRepository userRepository;

@Override
public void open(Configuration parameters) throws Exception {
AppInjector.injectMembers(this);
}

@Override
public User map(Long userId) throws Exception {
Objects.requireNonNull(userId, "User ID is null");
return userRepository.getById(userId).orElseThrow(() -> new RuntimeException("User not found"));
}
}

Motivation

Dependency injection, or DI, is a common practice in Java programming, especially when you come from a Spring background. The most direct benefit is testability, meaning you can replace class implementation with test stub. Other benefits are separation of concerns, better class hierarchy, inversion of control, etc. Component defines its dependencies via class constructor or annotated members, and the DI framework creates a container, or context, to wire these components properly. This context is usually created at startup and lives through the application lifecycle. Some examples are Spring ApplicationContext, Guice Injector.

Flink is a distributed computing framework, and it is favorable to decouple business logic from it by dependency injection. However, Flink application is composed of functional classes, that are instantiated in driver class, or main method, serialized and sent to distributed task managers. We cannot inject dependencies into these classes unless all our components are serializable. Fortunately, Flink provides a lifecycle hook open that is called when the job starts. Combined with another common pattern, Singleton, we can make DI framework play well with Flink.

Read More

Define API Data Models with Pydantic

In modern architecture, frontend and backend are separated and maintained by different teams. To cooperate, backend exposes services as API endpoints with carefully designed data models, for both request and response. In Python, there are numerous ways to complete this task, such as WTForms, marshmallow. There are also frameworks that are designed to build API server, like FastAPI, Connexion, both are built around OpenAPI specification. In this article, I will introduce Pydantic, a validation and serialization library for Python, to build and enforce API request and response models. The web framework I choose is Flask, but Pydantic is framework-agnostic and can also be used in non-web applications.

Pydantic

Define response model

After pip install pydantic, let’s define a simple response model to return the currently logged-in user:

1
2
3
4
5
6
7
8
9
10
11
from pydantic import BaseModel

class User(BaseModel):
id: int
username: str
last_login: datetime

@app.get('/current-user')
def current_user() -> dict:
user = User(id=1, username='jizhang', last_login=datetime.now())
return user.model_dump(mode='json')

Then use httpie to test the API:

1
2
3
4
5
6
7
8
9
% http localhost:5000/current-user
HTTP/1.1 200 OK
Content-Type: application/json

{
"id": 1,
"username": "jizhang",
"last_login": "2024-01-25T10:25:23.670431"
}
  • We create Pydantic model by extending BaseModel, which is the basic approach. There are others ways like dataclass, TypeAdapter, or dynamic creation of models.
  • Model fields are simply defined by class attributes and type annotations. Unlike other SerDe libraries, Pydantic is natively built with Python type hints. If you are not familiar with it, please check out my previous blog post.
  • In the API, we manually create a model instance user. Usually we create them from request body or database models, which will be demonstrated later.
  • Then we serialize, or “dump” the model into a Python dict, that in turn is transformed by Flask into a JSON string. We can also use user.model_dump_json(), which returns the JSON string directly, but then the response header needs to be manually set to application/json, so we would rather let Flask do the job.
  • mode="json" tells Pydantic to serialize field values into JSON representable types. For instance, datetime and Decimal will be converted to string. Flask can also do this conversion, but we prefer keeping serialization in Pydantic model for clarity and ease of change.

Read More

Python Static Type Check

Python is by design a dynamically typed programming language. It is flexible and easy to write. But as the project size grows, there will be more interactions between functions, classes and modules, and we often make mistakes like passing wrong types of arguments or assuming different return types from function calls. Worse still, these mistakes can only be spotted at runtime, and are likely to cause production bugs. Is it possible for Python to support static typing like Java and Go, checking errors at compile time, while remaining to be easy to use? Fortunately, from Python 3.5 on, it supports an optional syntax, or type hints, for static type check, and many tools are built around this feature. This article covers the following topics:

  • A quick start to do static type check in Python.
  • Why do we need static typing?
  • Python type hints in detail.
  • Other advanced features.

Mypy

Quick start

Static typing can be achieved by adding type hints to function arguments and return value, while using a tool like mypy to do the check. For instance:

1
2
def greeting(name: str) -> str:
return 'hello ' + name

Here the function greeting accepts an argument which is typed as str, and its return value is also typed str. Run pip install mypy, and then check the file:

1
2
% mypy quickstart.py
Success: no issues found in 1 source file

Clearly this simple function would pass the check. Let’s add some erroneous code:

1
2
3
4
5
6
def greeting(name: str) -> str:
real_name = name + 1
return 'hello ' + real_name

greeting(1)
greeting('world') + 1

There will be plenty of errors found by mypy:

1
2
3
4
5
% mypy quickstart.py
quickstart.py:2: error: Unsupported operand types for + ("str" and "int") [operator]
quickstart.py:5: error: Argument 1 to "greeting" has incompatible type "int"; expected "str" [arg-type]
quickstart.py:6: error: Unsupported operand types for + ("str" and "int") [operator]
Found 3 errors in 1 file (checked 1 source file)

The error messages are pretty clear. Usually we use pre-commit hook and CI to ensure everything checked into Git or merged into master passes mypy.

Read More

Migrate from Pip requirements.txt to Poetry

Dependency management is a critical part of project development. If it were done wrong, project would behave differently between development and production environments. With Python, we have the tool virtualenv that isolates the project’s environment from the system’s, and we use pip and a requirement.txt file to maintain the list of dependencies. For instance:

1
2
3
Flask==3.0.0
Flask-SQLAlchemy==3.1.1
-e .

And the environment can be setup by:

1
2
3
% python3 -m venv venv
% source venv/bin/activate
(venv) % pip install -r requirements.txt

Disadvantages of the requirements.txt approach

There are several shortcomings of this method. First and the major problem is this file only contains the direct dependencies, not the transitive ones. pip freeze shows that Flask and Flask-SQLAlchemy depend on several other packages:

1
2
3
4
5
6
7
8
% pip freeze
Flask==3.0.0
Werkzeug==3.0.1
Jinja2==3.1.2
Flask-SQLAlchemy==3.1.1
SQLAlchemy==2.0.25
-e git+ssh://git@github.com/jizhang/blog-demo@82e4b4c4c6e72ed44e0cce9ee45aca5abc4dc87b#egg=poetry_demo&subdirectory=poetry-demo
...

Take Werkzeug for an example. It is required by Flask, and its version is stated as Werkzeug>=3.0.0 in Flask’s project file. This may cause a problem when Werkzeug bumps its version to 4.x and after a reinstallation of the project, it will download the latest version of Werkzeug and create a compatibility issue. Same thing may happen to Flask-SQLAlchemy since functions of SQLAlchemy may vary between major versions.

A possible solution is to freeze the dependencies altogether:

1
% pip freeze >requirements.txt

This is practically the lockfile we see in other languages like yarn.lock and Gemfile.lock, whereby the installation process is fully reproducible. But for Python, we need extra effort to ensure that the requirements.txt is updated correctly after modifying the dependencies. And it also makes it difficult to upgrade the direct dependencies because the transitive ones need to be upgraded manually.

Read More

Setup CI with GitHub Actions (Java/Node/Python)

Continuous integration, or CI, is a great tool to maintain a healthy code base. As in lint-staged‘s motto, “don’t let 💩 slip into your code base”, CI can run various checks to prevent compilation error, unit test failure, or violation of code style from being merged into the main branch. Besides, CI can also do the packaging work, making artifacts that are ready to be deployed to production. In this article, I’ll demonstrate how to use GitHub Actions to define CI workflow that checks and packages Java/Node/Python applications.

CI with GitHub Actions

Run Maven verify on push

CI typically has two phases, one is during development and before merging into the master, the other is right after the feature branch is merged. Former only requires checking the code, i.e. build the newly pushed code in a branch, and see if there’s any violation or bug. After it’s merged, CI will run checking and packaging altogether, to produce a deployable artifact, usually a Docker image.

For Java project, we use JUnit, Checkstyle and SpotBugs as Maven plugins to run various checks whenever someone pushes to a feature branch. To do that with GitHub Actions, we need to create a workflow that includes setting up Java environment and running mvn verify. Here’s a minimum workflow definition in project-root/.github/workflows/build.yml:

1
2
3
4
5
6
7
8
9
10
11
12
13
name: Build
on: push
jobs:
verify:
runs-on: ubuntu-latest
steps:
- uses: actions/checkout@v3
- uses: actions/setup-java@v3
with:
java-version: '17'
distribution: temurin
cache: maven
- run: mvn --batch-mode verify

Read More

RESTful API Authentication with Spring Security

When it comes to implementing user authentication in RESTful API server, there’re several options like Spring Security, Apache Shiro, or writing our own version of Filters and Servlets. If the server already uses Spring Boot, then Spring Security is really a good fit, for it integrates quite well with Spring Boot project, thanks to all those automatic configurations. However, Spring Security’s login facility is originally built for web forms or basic HTTP authentication, while modern apps usually lean on RESTful API. We can either adapt the frontend client to utilizing the built-in login methods as in this tutorial Spring Security and Angular JS, or write custom Filter to extract user credentials from input JSON.

Spring Security

Having said that, personally I still prefer to maintain a consistent API style in user authentication, and I don’t want to write awkward logics with raw Servlet request/response objects in Filter, instead of using what Spring MVC provides, i.e. @RestController, @RequestBody, form validation, etc. Luckily, Spring Security provides integration for Servlet API, so that we can login/logout user within the Controller. In this article, I will demonstrate how to use Spring Security to guard your RESTful API server, with the following functions:

  • Login/logout with JSON API.
  • Return 401 for unauthenticated requests.
  • Custom table for user data.
  • CSRF protection.
  • Remember me.
  • Session persistence.

Read More

Mock API in Parcel Project

When developing a frontend application, usually we create mocks for backend API, so that after the API contract is settled down, front and backend engineers can work independently. There are several ways to accomplish this task, such as start a dedicated server and let the build tool serve as a proxy, or we can add middleware directly into the build tool’s dev server, if applicable. Some tools can monkey patch the network calls to replace the response with mock data, and various unit testing tools provide their own way of mocking. In this article, I will focus on how to add middleware into Parcel‘s dev server to respond with mock data for API calls.

Parcel

API Proxy in Parcel’s development server

Parcel provides a dev server and supports API proxy out of the box. Under the hood, it uses connect and http-proxy-middleware to redirect API calls to a different server. It also provides the ability to customize the proxy behavior. For instance, by creating a file named .proxyrc.js in project’s root, we can manually redirect all API calls to a mock server listening on localhost:8080.

1
2
3
4
5
6
7
8
const { createProxyMiddleware } = require('http-proxy-middleware')

module.exports = function (app) {
const proxy = createProxyMiddleware('/api', {
target: 'http://localhost:8080/',
})
app.use(proxy)
}

In order to serve API calls directly in Parcel’s dev server, we just need to write our own middleware and wire it into the connect instance. Let’s name it mock-middleware, and it has the following functions:

  • Read source files from the /mock folder, and serve API calls with mock data.
  • When the files are updated, refresh the APIs as well.

Read More

Configure Git Line Endings Across OSes

In Linux, lines end with LF (Line Feed, \n), while in Windows, CRLF (Carriage Return + Line Feed, \r\n). When developers using different operating systems contribute to the same Git project, line endings must be handled correctly, or diff and merge may break unexpectedly. Git provides several solutions to this problem, including configuration options and file attributes.

TL;DR

Approach 1

Set core.autocrlf to input in Windows. Leave Linux/macOS unchanged.

1
git config --global core.autocrlf input

Approach 2

Create .gitattributes under the project root, and add the following line:

1
* text=auto eol=lf

Read More

Configure Logging for Flask SQLAlchemy Project

In Python, the built-in logging module is the standard way of doing application logs, and most third-party libraries integrate well with it. For instance, Flask creates a default app.logger with a StreamHandler that writes to standard error. SQLAlchemy uses a logger named sqlalchemy and allow us to further customize its behaviour. This article shows how to configure logging for Flask and SQLAlchemy, both in debug mode and production mode.

Default logging behaviour of Flask

According to Flask document, when the app.logger property is accessed for the first time, it creates a logger with the name of the application, usually the module name you used in app = Flask(__name__). The logging level is set to DEBUG if current application is in debug mode, or NOTSET and lets parent loggers decide the level. Then it checks if a log handler has already been added to the logger or any parent loggers, otherwise it adds a default one. The log format is as follows:

1
logging.Formatter("[%(asctime)s] %(levelname)s in %(module)s: %(message)s")

In application, we can invoke the logging methods on app.logger:

1
2
3
4
from flask_logging import app  # flask_logging is the project name

# Invoke in flask_logging.views.user module.
app.logger.info('Get user list')

The output is:

1
[2022-08-08 18:33:11,451] INFO in user: Get user list

In production, the root logger is set to WARNING level by default, so only warning, error, and critical messages will be logged.

Read More

Use Composition API and Pinia in Vue 2 Project

Composition API is one of the major features of Vue 3, and it greatly changes how we organize code. Vue 3 also introduces Pinia as the recommended state management library, superceding Vuex that now enters maintenance mode. It would be nice if we can use these cool features in Vue 2 project, since migration of legacy project could be difficult and costly. Fortunately, the community has tried hard to bring Vue 3 features back to Vue 2, like @vue/composition-api, unplugin-vue2-script-setup and vue-demi. Recently, Vue 2.7 is released and backports features like Composition API, <script setup>, defineComponent, etc. This article will show you how to change your code from Options API to Composition API, from Vuex to Pinia.

Why Composition API

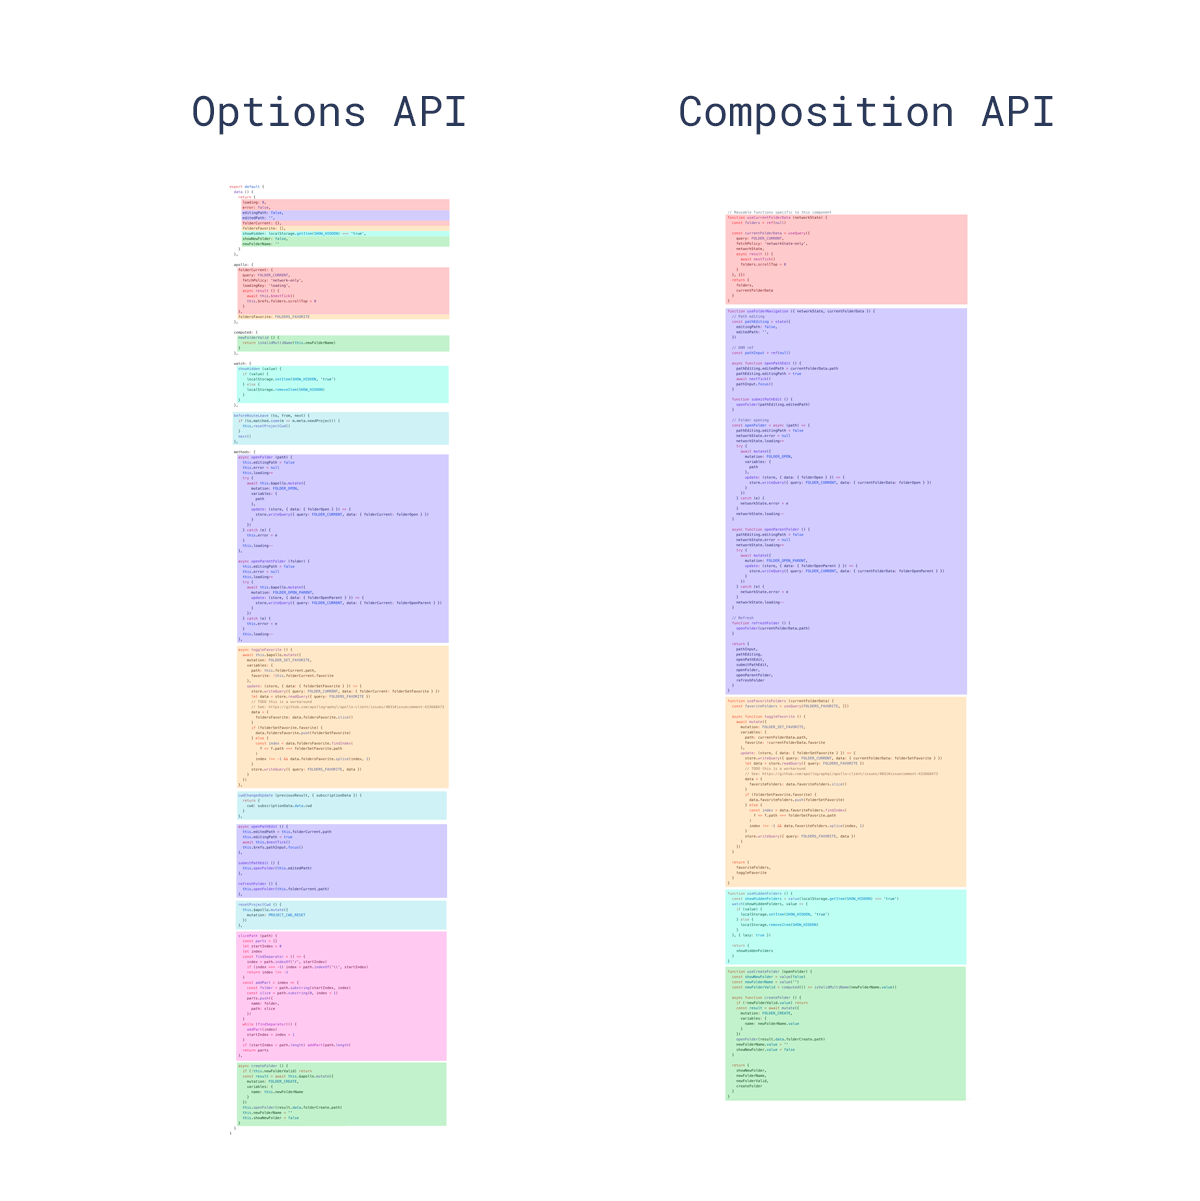
The main advantage of Composition API is that you can organize your code in a more flexible way. Previously with Options API, we can only group codes by data, methods, and hooks, while with Composition API, codes constituting one feature can be put together. There is a nice figure in the official document Composition API FAQ that illustrates how code blocks look differently after applying Composition API.

Options API vs. Composition API

Read More